")
Understanding Headlight Degradation
The Causes of Headlight Yellowing and Oxidation
Headlights can turn yellow and oxidize for several reasons. The main cause is UV light from the sun, which breaks down the headlight’s material. Air pollution and road chemicals also play a part. Over time, these factors cause the plastic to fade and become less clear. This happens faster if you park your car outside often. To avoid this wear, it’s key to know the triggers and guard against them. Small actions like parking in the shade can help. Regular maintenance is also vital to keep your headlights bright and clear.
Impact of UK Weather on Headlight Clarity
UK weather is tough on headlights. Rain, snow, and fog can all dim their shine. On sunny days, UV rays speed up the wear. Salt from roads in winter also harms headlight surfaces. To keep lights clear, clean them often. Wax or seal them to fight off weather damage. Take care of your headlights to avoid costly restorations.
DIY vs Professional Headlight Restoration
Pros and Cons of DIY Headlight Restoration Kits
- Pros:
- Cost-Effective. DIY kits are less costly than a pro service.
- Convenience. You can do it anytime, without an appointment.
- Learning. Gain knowledge on car maintenance.
- Satisfaction. Feel proud of doing the work yourself.
- Cons:
- Quality. Results may be less impressive than a pro’s work.
- Time. It may take longer if you’re not experienced.
- Risk. You might damage your headlights if done wrong.
- Durability. DIY may not last as long as a pro job.
Estimating Headlight Restoration Costs in the UK
When considering headlight restoration in the UK, comparing costs is key. DIY kits can range from £10 to £30. They are less costly than pros who may charge from £40 to over £100. The price varies by kit quality and pro expertise. Remember, pros can often offer a warranty. This can add value to the service. Factor in time too. A DIY job takes a few hours, while a pro can be quicker. Weigh the costs against convenience and desired results.
Step-by-Step Guide to Restoring Your Headlights
Preparing Your Headlights for Restoration
- Begin by cleaning the headlights with soapy water to remove grime.
- Dry them thoroughly with a soft cloth to avoid water spots.
- Tape off the surrounding areas to protect your vehicle’s paintwork.
- Inspect the headlights for any deep scratches or damage that might need extra work.
- Ensure you have a well-lit, well-ventilated space to work in.
- Read the instructions of your chosen restoration kit thoroughly before starting.
- Gather all necessary materials in advance to streamline the process.
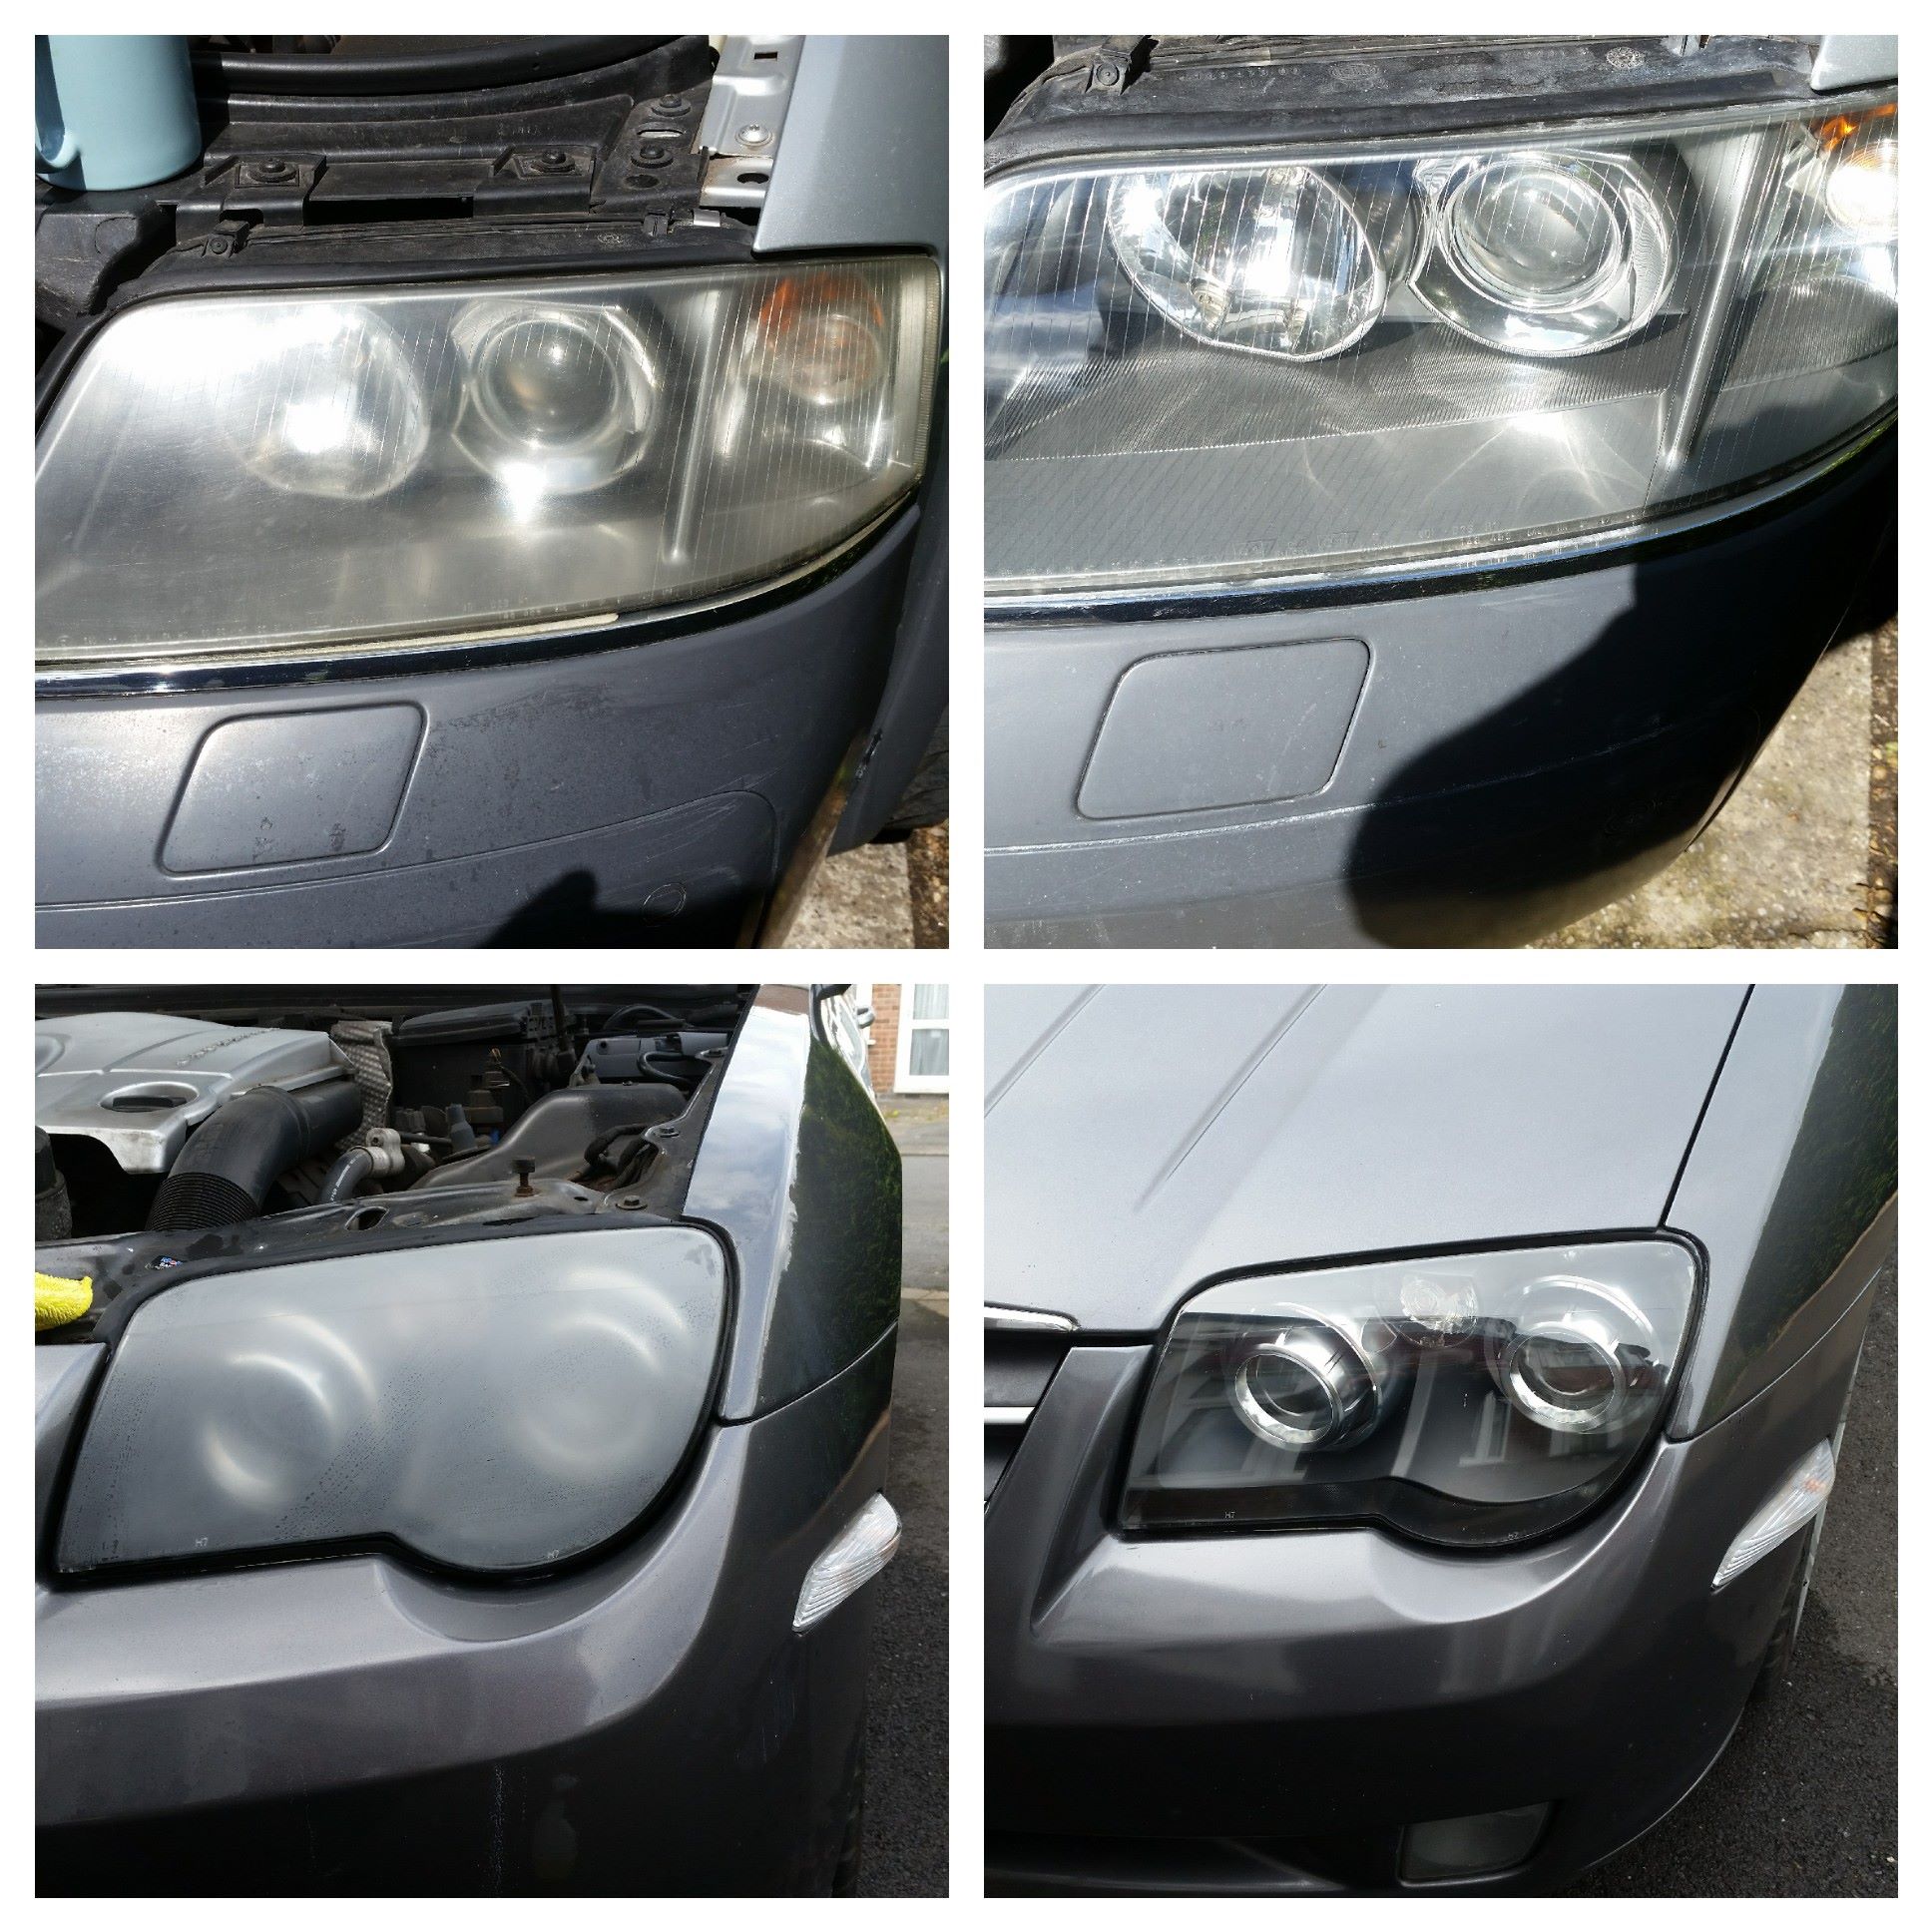
The Restoration Process: Techniques and Tips
Restoring headlights is a process you can often do at home. Below are the steps to follow for best results:
- Clean the surface: Begin by washing the headlights with soap and water. Remove any dirt and grime.
- Sand the headlights: Use varying grit sandpapers, starting with a coarser grit and moving to finer grit. This removes the yellowed layer.
- Polish: After sanding, apply a polishing compound. Work it in a circular motion to achieve a smooth finish.
- Protect: Finally, apply a sealant or UV protectant. This adds a protective layer to prevent future damage.
- Evaluate: Check the clarity of your headlights once finished. If they are still foggy, you may need to repeat the process.
Remember to follow all kit instructions if you use one. Each product may have specific steps to follow for optimal results. And always work in a well-ventilated area to keep safe.
Maintenance Tips to Prolong Headlight Clarity
Regular Cleaning and Protective Measures
Keeping headlights clear is vital for safety and visual appeal. Regular cleaning is step one. Use mild soap and water for best results. Dry gently with a microfiber cloth to avoid scratches. Apply a headlight protectant regularly. This shields against dirt and UV rays. Choose a protectant with UV blockers for extra defense. Also, inspect seals around headlights often. Replace them if they’re worn to keep moisture out. Park in the shade or use a car cover to limit sun exposure. Avoid harsh chemicals on headlight surfaces. They can cause damage over time.
Products and Practices to Avoid
When caring for your headlights, some products and practices can do more harm than good. Avoid using abrasive materials like sandpaper, which can scratch the lens surface. Steer clear of harsh chemicals such as acetone or bleach, as they can damage the headlight’s protective coating. Don’t use household glass cleaners containing ammonia on polycarbonate lenses; it can lead to yellowing. Avoid cleaning your headlights in direct sunlight or when the lens is hot, which can cause cleaners to evaporate and leave residues. Lastly, don’t ignore small scratches or chips, as they can worsen over time, leading to the need for a full restoration.
When to Opt for Headlight Restoration
Signs That Your Headlights Need Restoration
Assessing the right time for headlight restoration is vital. This can avoid poor visibility and ensure safety on UK roads. Look out for telltale signs that show your headlights need care. Here are common indicators:
- Dimness: When your headlights are not as bright as before. This may pose risks in low light.
- Yellowing: If the clear plastic turns yellow, it’s a sign of oxidation. It affects light output.
- Scratches or damage: Deep marks or cracks can scatter light beams. This impairs your view.
- Fogginess: Cloudiness reduces how well you see at night. It can lead to dangerous situations.
If you notice any of these issues, consider restoring your headlights promptly. It will improve safety and may be required by law.
How Often Should Headlights Be Restored?
Headlights should be checked regularly for clarity and brightness. Most experts suggest a full restoration every one to three years. However, this can vary based on your driving habits and the UK’s weather conditions. If you often drive at night or in bad weather, more frequent restorations may be needed. Inspect your headlights during routine car maintenance to ensure safety and optimal performance.
Advanced Headlight Protection Techniques
Sealants and Coatings: Pros and Cons
Protecting your car’s headlights from damage is crucial. Sealant and coatings can help. These products add a protective layer over the lens. They shield against UV rays and grime. But they have pros and cons. Pros include adding shine and resisting scratches. They also prevent fading and keep headlights clear for longer. As for cons, some products may not last long. Others may need professional application. Some may not be suited for all headlight types. It’s important to weigh these factors before deciding.
UV Protection for Your Vehicle’s Headlights
UV rays can harm your car’s headlights, leading to a foggy or yellow look. To protect them, choose a UV-resistant sealant or film. This acts as a barrier. It blocks the sun’s harmful rays. It keeps the lenses clear for longer. Make sure to apply the UV protection correctly. Follow the product’s instructions. This will ensure the best shield against UV damage. In sunny UK regions, this is even more crucial. UV protection can extend the life of your headlights. It will save you from frequent restorations. This is both cost-effective and time-efficient.
Evaluating Headlight Restoration Kits
Components of a Good Restoration Kit
- Abrasive discs or sandpaper: For removing the yellowed layer.
- Polishing compound: To refine and smooth out the lens surface.
- Sealant: Offers a protective barrier against future damage.
- Gloves and safety equipment: Essential for safe application.
- Instruction manual: Guides the user through the restoration process.
- UV protection: Protects headlights from the sun’s harmful rays.
- Cleaning solution: To prep the lenses before sanding.
Top Headlight Restoration Kits in the UK Market
- 3M Headlight Restoration Kit: Known for its complete system, including sanding pads and polish.
- Turtle Wax Headlight Restorer Kit: Offers a user-friendly solution with clear instructions.
- Meguiar’s Headlight Restoration Kit: Ideal for removing heavy oxidation, providing a deep clean.
- Rain-X Headlight Restoration Kit: Features a unique multi-step process to ensure a lasting finish.
- Autoglym Headlight Restoration Complete Kit: Comes with a more detailed process for professional results.
The Long-term Benefits of Headlight Maintenance
Safety Implications of Clear Headlights
Maintaining clear headlights is key for safe driving. It boosts visibility at night and during poor weather. Clear lights help drivers see further. This reduces the risk of accidents. It allows you to spot hazards sooner. Clear lights are vital in less-lit rural UK areas. They’re also important for detecting pedestrians and cyclists. Regular headlight maintenance can save lives.
Enhancing Vehicle Aesthetics and Resale Value
Restoring headlights can do more than improve safety. It also adds to your car’s appeal. Clean, clear headlights make the vehicle look newer and better cared for. This boost in aesthetics can be crucial when selling. Buyers are drawn to cars that have been well-maintained. A car with foggy headlights may seem old or neglected. By keeping the headlights clear, you can preserve or even raise the resale value. It’s a small investment for a significant return.
 Reflective Desire